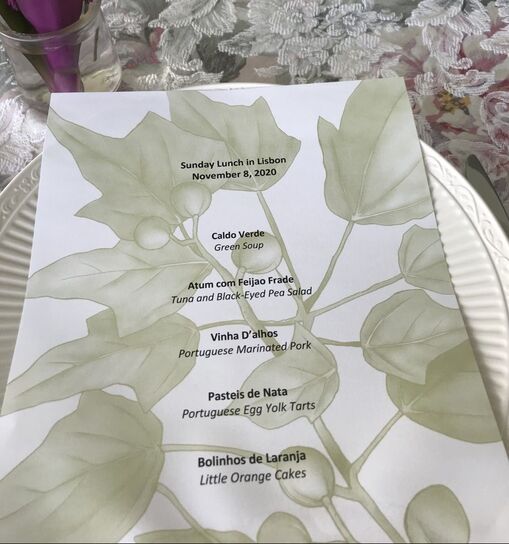
During the past year as we were sheltering and dining at home only with the members of our family “bubble,” we entertained ourselves by exploring a variety of culinary cultures in our weekend family meals. This was our form of virtual travel. One of my favorite menus was a Portuguese lunch I hosted based on happy memories of the time Wayne and I spent in beautiful Portugal, a place where Easter is celebrated with enthusiastic traditional religious torchlight and candlelight processions, ancient rituals and festivals filled with fresh flowers. Although we ate this meal in November, all of the items we enjoyed, including Green Soup, Egg Yolk Tarts and Little Orange Cakes, would fit in perfectly at any Easter feast.
For a more detailed virtual culinary trip to Portugal, you are welcome to explore the “Portuguese Tea” on this website. In addition to a menu of Portuguese foods you can enjoy with Afternoon Tea, this chapter of “A World of Tea Parties” includes a discussion of Portugal’s role in introducing tea parties to the rest of Europe and Portugal’s influence on the foods of several Asian countries. Because Portugal was the leader in European explorations in Asia in the 1500’s, we place Portugal second only to China, where tea originated, in sharing tea with the rest of the world. As you read “A Portuguese Tea,” you will find photographs of Hawaiian Sweet Bread (which originated in Portugal,) Caldo Verde, the famous Portuguese Green Soup and Pasteis de Nata (sometimes called Pastel de Nata,) the famous and uber-delicious Portuguese Egg Yolk Tarts. Hawaiian Sweet Bread is easy to find in your local grocery store. You can order the recipes for the other items from our “Portuguese Tea” from our website if you wish.
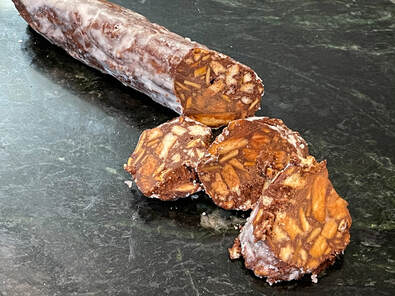
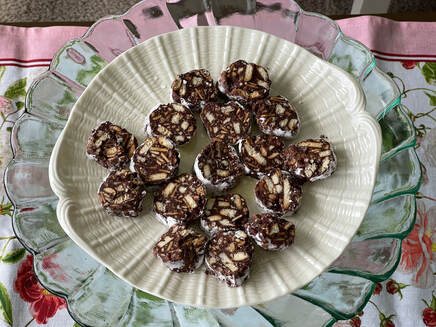
For your Easter Basket, April Tea Party or Special Spring Lunch, I am happy to share the recipes for two last-minute treats that I think are a lot more delicious than marshmallow chicks and chocolate bunnies: Bolinhos de Laranja (Little Orange Cakes) and Salame de Chocolate (Chocolate Salami) a favorite sweet in Portugal at Easter time.
Bolinhos de Laranja (Portuguese Little Orange Cakes)
These grownup gourmet “cupcakes” derive their ultimate lusciousness from freshly grated orange zest and freshly squeezed orange juice along with a generous amount of butter. This recipe calls for sprinkling the tops with sanding sugar at the end of the baking process. Sanding sugar is a large crystal sugar used to decorate baked goods. It comes in a variety of colors and creates a sparkling effect. White crystal sugar looks prettiest on Bolinhos de Laranja, but if you don’t have any in your pantry, just use regular white granulated sugar. You can make these lovely little orange cakes in a muffin pan using decorative paper cups, but if you happen to own a mini-Bundt pan, your cakes will be even prettier, with the sparkling sugar on the bottoms. This subtle detail will not be lost on your appreciative guests.
- 1 ½ cups all-purpose flour
- 2 teaspoons baking powder
- ¼ teaspoon salt
- 3 large naval oranges
- 1 ¼ cups sugar
- 1 cup fresh orange juice, from 3 large oranges
- 1 cup (2 cubes) unsalted butter, melted
- 4 large eggs, at room temperature
- 1 teaspoon vanilla
- White crystal sanding sugar for sprinkling
- Baking spray with flour if using mini-Bundt pans
Special equipment: 2 muffin pans or mini-Bundt pans, or 1 of each, decorative paper baking cups if using muffin pans, 1 large mixing bowl, 1 medium sized mixing bowl, fork, sieve or flour sifter, small microwave-safe bowl, hand-held electric mixer, rubber spatula, 2 wire cooling racks, citrus zester, citrus juicer, small ladle, parchment paper
Makes: about 24 little cakes
- Grate the zest from 2 of the large oranges into a medium sized mixing bowl. Using a citrus juicer, squeeze the juice from the 3 oranges into another container until you have 1 cup. Set aside.
- Sift the flour, baking powder and salt into the medium sized bowl containing the orange zest. Stir with a fork to incorporate the zest into the dry ingredients. Cut the butter into cubes and melt it in a microwave-safe bowl at 30-second intervals until no chunks remain. Set aside.
- In a large mixing bowl using an electric mixer, beat the eggs and sugar on medium speed for 3-4 minutes until the mixture becomes pale and falls in ribbons from the beaters. Stir in the orange juice, melted butter and vanilla. Beat briefly until incorporated into the sugar mixture. Add the dry ingredients and beat only until no flour is visible. Do not overbeat.
- Fill the muffin pan with paper baking cups and, using a small ladle, fill each cup ¾ full. If using mini-Bundt pans, spray each well with baking spray with flour and fill ¾ full. Bake for 13-14 minutes.
- Open the oven and sprinkle the tops of the cakes with white sanding sugar or granulated sugar. Place the pans back in the oven, turn the oven off, and let the cakes remain in the oven for 2 minutes. Remove the baking pans and cool the cakes on wire racks for 5 minutes. Gently unmold onto a large sheet of parchment paper on the counter. Run a thin knife around the edges of the mini-Bundt pan wells if necessary.
- Serve warm or at room temperature. Store in airtight containers at room temperature for 2-3 days, or freeze.
Salame de Chocolate (Chocolate Salami)
Although the shape is different, the ingredients in Chocolate Salami are similar to its British counterpart, Chocolate Biscuit Cake, a favorite tea-time treat of Queen Elizabeth II. Both desserts are essentially good quality dark chocolate melted and mixed with roughly crushed tea biscuits such as Marie Cookies or Mc Vitie’s Digestive Biscuits. Since neither of these was available in any grocery store within a few miles of my home, I used Diamond brand Original Hawaiian Royal Cream Crackers. Some recipes for Portuguese Salame de Chocolate also include chopped toasted nuts and a generous splash of Port. I chose toasted almonds and a teaspoon of Rum.
The logs are wrapped in parchment, then rolled in powdered sugar before slicing The result is little round flat slices in which the dark chocolate resembles the meat in salami and the bits of cookie look like flecks of fat. The unevenly distributed coating of powdered sugar mimics the whitish coating on the outside of a Salami. What fun!
- 8 ounces of tea biscuits, (Marie Cookies, Mc Vitie’s Digestive Biscuits or Hawaiian Royal Cream Crackers)
- 1 cup toasted sliced almonds, slightly crushed
- 8 ounces good quality dark chocolate (I used Ghirardelli’s Bittersweet Chocolate 60% cocoa.)
- 1 stick (4 ounces) unsalted butter
- ½ cup heavy cream
- 1 teaspoon Port or Rum, optional
- Powdered sugar for coating.
Makes: 2 logs of Chocolate Salami, 6-8 dozen slices
- Break the tea biscuits, crackers or cookies into large pieces into a 1-gallon zip-lock bag. Crush with a rolling pin into coarse, unevenly sized crumbs. Set aside.
- Into a large glass measuring cup or bowl, place the chocolate, broken into pieces, and the butter, cut into large chunks. Add the cream and microwave at 30-second intervals, stirring with a rubber spatula, until the mixture is smooth, and no chunks of chocolate or butter remain. Stir in 1 teaspoon or Port or Rum if desired.
- Add the crushed toasted almonds and cookie crumbs to the chocolate mixture and stir carefully with the rubber spatula until all of the ingredients are well mixed.
- Place a large piece of parchment onto the counter and transfer half of the chocolate mixture onto the parchment, roughly in the shape of a 16-inch log. Roll up the parchment, shaping the log as you do so, tightly wrapping the paper around the log. Secure the ends by folding the parchment under and transfer the log to a flat space in the refrigerator. Create the second log on another piece of parchment following the same process.
- Refrigerate the logs for at least 2 hours or overnight. When ready to slice the salami, unroll 1 log at a time and sift a generous amount of powdered sugar over the log. Use disposable gloves as you roll the log back and forth through the powdered sugar, forming it into a round shape to look as much like a salami as possible. Remove excess sugar with your gloved fingers. If the log has been frozen, give it time to thaw in the refrigerator. A refrigerated log may need a few minutes at room temperature before you slice it.
- Use a sharp serrated knife to slice the log into little disks, approximately ¼ inch thick. Some crumbling of the cookie crumbs may occur during this process, and the work may get a little messy. Use your fingers to pinch the disks back into round shapes. Relax and do not rush. You will end up with deliciously deceptive little slices of “salami.” Place these on a decorative plate or 2-tiered server. Keep refrigerated until shortly before ready to serve.
- Freeze the second log or slice as described above. Depending on the thickness of your slices, if you use both logs, you will end up with 6-8 dozen little slices of Chocolate Salami.


 RSS Feed