
I am fortunate to be surrounded by lots of enthusiastic eaters, many excellent cooks, and a few passionate bakers. My interest in baking started when I was about six years old and has continued into a long cooking and baking avocation and career. One of my earliest multi-tiered cakes was a 50th anniversary cake for my Pedulla grandparents, circa 1978. I was joined in this daunting task by my cousin, Laura Jamieson (now Sampson), who is also a baker since childhood. I think it might have taken three nerve-racking days for the two of us to get this towering construction ready for the party. It seemed as if we’d completed an almost impossible, magical quest. It was far from perfect, but it was beautiful and delicious and most importantly, our grandparents enjoyed it.
Laura has been keeping gluten free for twenty years now and has developed recipes and strategies for making truly decadent and delicious gluten free dishes for every occasion. She shares this wealth of knowledge on her blog, Mama Laura's Kitchen . She has most graciously consented to do a guest blog here. I saw her recipe for sourdough discard crackers on her Instagram account, gfgirlmamalaura. Not only do I think baking homemade crackers is super rewarding, I am also always looking for ways to use sourdough starter discard. I also love that those bakers who need to keep gluten free can join in the sourdough craze, yay!
I was going to write a little biography of Laura’s baking life, but she has done such a good job of it herself, I decided to crib the bio from her blog and reprint it here. Thank you so much, Laura, for sharing your recipes with us. Without more ado, here is Laura:
| “As I start this blog, I thought I'd tell you a bit about myself. I didn't always love cooking. Growing up I was the official "baker" in the family. By the time I got married at age 21, I really knew very little about cooking, but I could follow a recipe, just like any good baker could. My husband began to show me in the kitchen that it was about trying new things, moving away from the exactness that baking required and being adventuresome (something that didn't come easily for me.) Soon I found that I liked trying new recipes and making up different twists on dishes. Much of my inspiration comes from trips we have been on or from my heritage: my Italian grandparents and my grandmother (Rosina ~ we liked to call her Rose, showing me how to cook many Italian dishes, pasta sauces, soups and dessert Every Sunday my family would head to my grandparents for our pasta supper at exactly twelve noon. Delicious sauce was at nearly every meal at their house as was opera to entertain us after dinner. At the time I could have probably done without the opera, but looking back I know it was adding culture and love of music into my heart. I was fascinated with the old books that lined my Grandpa Joe's shelves. One by one I would read their titles and see which one I wanted to borrow. The books had journeyed with him from his days of teaching English as a second language to Italians. Now, many are featured on my bookshelves, memories of so many times in that house. And although there was a fair amount of arguing and yelling at times (we Italians do have tempers,) I really mostly remember the good times, good food, family, walks through the garden, and shelves of books to be read. I remember fondly my grandmother showing me the ways of the Italian kitchen. I am hoping to share a little of what I've learned with you ~ I will also be sharing many of my own gluten free recipes, as for the past 20 years I have been eating completely gluten free after suffering many years with an undiagnosed severe gluten allergy.” ~Laura Sampson, (updated July 2021) |
Enjoying simple pleasures when you are needing to eat gluten free is a wonderful thing. Making and eating delicious gluten free crackers is one of those pleasures! Developing a gluten free cracker that is equally crispy, light and just as delicious as any gluten filled cracker, was a wonderful discovery. Processed gluten free baked items have become much more sophisticated and better tasting over the twenty plus years I have been eating a gluten free diet. Originally, I started writing recipes for gluten free food for myself, as I was tired of eating sub-standard tasting and texture food. I knew gluten free food had to be better than that! So, long before blended gluten free flours were a thing, I came up with lots of recipes using different gluten free flour combinations to attain a desired end product that was tasty and not full of salt or sugar.
Now blended flours have come a long way in the past years, but I still want to control what is in the “blend” that I am making. Many purchased blends have added dairy, added cellulose (which my body does not tolerate), xanthan gum, and other emulsifiers, plus lots of other ingredients that may be unneeded for a particular recipe.
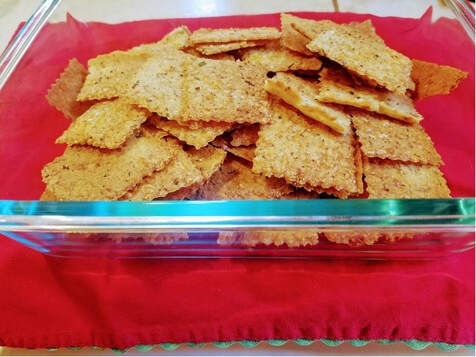
Here we have a simple cracker recipe, using gluten free sourdough discard. These crackers are so addicting! My husband, who does not need to eat gluten free, not only loves them, but also can't stay away from them! It's okay, I'm fine with sharing, because they are so simple to make and use the “discard” from my sourdough starter, which I'm always looking for new, fun ways to use. Just a few ingredients to stir together, then spread them on the pan and pop in the oven, and in about thirty minutes, you have crispy, savory, herb crackers! The best part of making your own gluten free crackers is that you can make any flavor combination you like. This week I made one pan of rosemary and garlic and one pan of sun- dried tomato and herb. Last week I had lots of chives from the garden I wanted to use, so I made fresh chives and cheddar crackers. The possibilities are endless! This recipe makes two pans worth, so there are plenty to share with family and friends, pop on a charcuterie board, or just grab a few to snack on. They stay crisp for about 6-7 days sealed in an airtight container.
My daughter, who is dairy intolerant and gluten free, tried making these without the cheese and said they are still delicious and even still taste like cheese! This is due to the sourdough starter in them. The tangy sharp taste resembles the taste of sharp cheese (plus they are buttery...yum). They taste like an incredible Cheez-it cracker, except way better! Enjoy! And I challenge you to not eat them all at once! I’ve included a substitute if you do not have a gluten free sourdough starter. See below for the recipe for the “biga” dough overnight fermentation.
In all my recipes, I have noted with a “gf” after the ingredient, for each ingredient which needs to be labeled gluten free, if you are accommodating someone who has Celiac or gluten intolerance. Even herbs and spices, vanilla, chocolate, flour types which are by nature gluten free, all need to be labeled and certified “Gluten Free” in order not to have cross-contamination. If you cannot find the certification on a product, look for ingredients that are made in a facility that does not process gluten.
Now blended flours have come a long way in the past years, but I still want to control what is in the “blend” that I am making. Many purchased blends have added dairy, added cellulose (which my body does not tolerate), xanthan gum, and other emulsifiers, plus lots of other ingredients that may be unneeded for a particular recipe.
Here we have a simple cracker recipe, using gluten free sourdough discard. These crackers are so addicting! My husband, who does not need to eat gluten free, not only loves them, but also can't stay away from them! It's okay, I'm fine with sharing, because they are so simple to make and use the “discard” from my sourdough starter, which I'm always looking for new, fun ways to use. Just a few ingredients to stir together, then spread them on the pan and pop in the oven, and in about thirty minutes, you have crispy, savory, herb crackers! The best part of making your own gluten free crackers is that you can make any flavor combination you like. This week I made one pan of rosemary and garlic and one pan of sun- dried tomato and herb. Last week I had lots of chives from the garden I wanted to use, so I made fresh chives and cheddar crackers. The possibilities are endless! This recipe makes two pans worth, so there are plenty to share with family and friends, pop on a charcuterie board, or just grab a few to snack on. They stay crisp for about 6-7 days sealed in an airtight container.
My daughter, who is dairy intolerant and gluten free, tried making these without the cheese and said they are still delicious and even still taste like cheese! This is due to the sourdough starter in them. The tangy sharp taste resembles the taste of sharp cheese (plus they are buttery...yum). They taste like an incredible Cheez-it cracker, except way better! Enjoy! And I challenge you to not eat them all at once! I’ve included a substitute if you do not have a gluten free sourdough starter. See below for the recipe for the “biga” dough overnight fermentation.
In all my recipes, I have noted with a “gf” after the ingredient, for each ingredient which needs to be labeled gluten free, if you are accommodating someone who has Celiac or gluten intolerance. Even herbs and spices, vanilla, chocolate, flour types which are by nature gluten free, all need to be labeled and certified “Gluten Free” in order not to have cross-contamination. If you cannot find the certification on a product, look for ingredients that are made in a facility that does not process gluten.
Best Ever Crispy and Savory Gluten Free Sourdough Crackers
Prep time: 15 minutes, plus prep and time for the “biga” if you don’t have a gluten free sourdough starter
Bake time: 10 minutes at 350 degrees F, 15-28 at 325 degrees F
Yields: 4-5 dozen, depending on the size of crackers
Ingredients:
Bake time: 10 minutes at 350 degrees F, 15-28 at 325 degrees F
Yields: 4-5 dozen, depending on the size of crackers
Ingredients:
- 1 cup sourdough starter, discard or unfed starter is fine, or overnight biga**
- ½ cup packed (49 grams) almond flour, almond meal or hazelnut flour, gf
- 2 ½ tablespoons olive oil
- 2 ½ teaspoons very soft or melted butter
- ¼ teaspoon salt
- ¼ teaspoon garlic powder, gf or 1 clove garlic crushed
- ½ cup (36 grams) finely grated parmesan, pecorino Romano or asiago cheese, optional
- 1 teaspoon of dried rosemary, gf or other dried gluten free herbs (oregano, basil, thyme or a mixture of a few kinds) crushed a bit with a mortar and pestle
Topping (Mix together or use a mortar and pestle to combine):
- ½ teaspoon coarse or flaked salt
- ¼-½ teaspoon of dried rosemary, gf (or other dried gluten free herbs)
- 1-2 teaspoons finely grated parmesan cheese, pecorino Romano, or asiago cheese, optional
Directions:
1. Preheat the oven to 350 degrees F.
2. With a mortar and pestle, crush the rosemary and coarse salt together for topping. Pour into a small bowl. Stir in one to two teaspoons of parmesan cheese (if using cheese). Set aside.
3. Stir together in a medium bowl, the sourdough starter or “biga”, almond flour or meal, olive oil, butter, salt, garlic or garlic powder, cheese, and herbs to get a smooth batter.
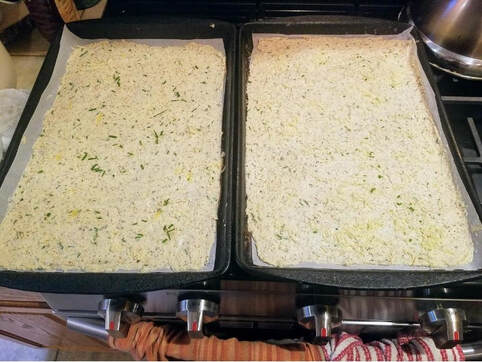
4. Line two stone bar pans or cookie sheets with parchment paper. Divide the dough evenly between the two pans, and spread with a rubber spatula until very thin and even on both trays. Using a spatula dipped in a small amount of water, or your fingers dipped in water, smooth the top of the cracker dough. Sprinkle with the topping ingredients, reserving enough for the second pan. Repeat the process for the second pan.
2. With a mortar and pestle, crush the rosemary and coarse salt together for topping. Pour into a small bowl. Stir in one to two teaspoons of parmesan cheese (if using cheese). Set aside.
3. Stir together in a medium bowl, the sourdough starter or “biga”, almond flour or meal, olive oil, butter, salt, garlic or garlic powder, cheese, and herbs to get a smooth batter.
4. Line two stone bar pans or cookie sheets with parchment paper. Divide the dough evenly between the two pans, and spread with a rubber spatula until very thin and even on both trays. Using a spatula dipped in a small amount of water, or your fingers dipped in water, smooth the top of the cracker dough. Sprinkle with the topping ingredients, reserving enough for the second pan. Repeat the process for the second pan.
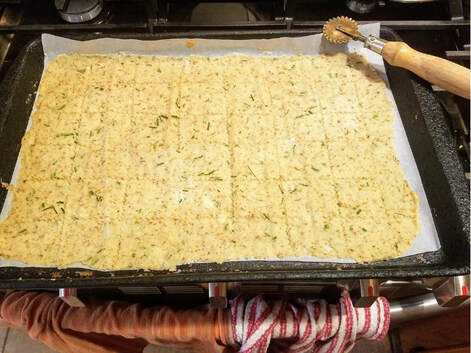
5. Bake one pan at a time on the middle rack, or if baking both trays at the same time, evenly spaced in the oven. Bake for 10 minutes. Remove the trays from the oven and score with a sharp knife or a ravioli cutter (making straight lines for your cracker squares in the size you like). You do not need to push the knife or cutter through to the bottom of the pan. This scoring will help you break these into nice square crackers once cooled.
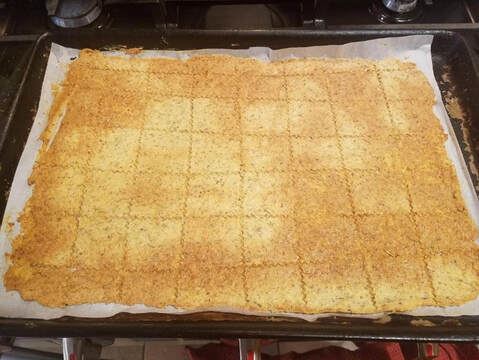
6. After scoring the dough, reduce the oven temp to 325 and return each tray to the oven, rotating the pans. Bake for 15-20 minutes, rotating again after each 10 minutes. Bake until the crackers are golden brown and crispy.
7. The crackers may not brown evenly on the entire pan. If some crackers are crispy and brown, remove by strips to a wire rack. Next, separate the remaining crackers to cook evenly and return to the oven for 5-8 minutes more.
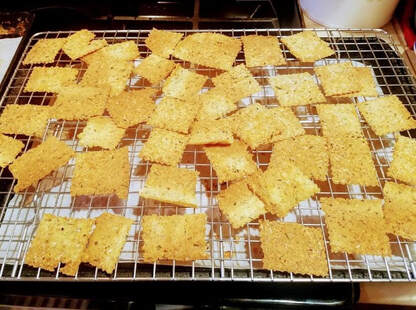
8. Remove the remaining crackers from the oven when crackers are crispy and golden brown. Cool completely on wire racks before breaking on the score marks and removing from the parchment to an airtight container (whatever is left after you enjoy some!)
8. Remove the remaining crackers from the oven when crackers are crispy and golden brown. Cool completely on wire racks before breaking on the score marks and removing from the parchment to an airtight container (whatever is left after you enjoy some!)
**If you don’t have a gluten free sourdough starter to use, you can make an overnight “biga”, a dough fermentation which is similar in texture to sourdough starter. Into ½ cup plus 1 tablespoon (112 grams) of cool water, stir ⅛ teaspoon of active dry yeast (a gluten free brand). Stir briskly and make sure some bubbles form before adding 1 cup (110 grams) of gluten free millet or gluten free brown rice flour (Ryze Gluten Free Flour Mix, yellow bag, is also fine). Cover loosely with cellophane and let sit on the counter for 18-20 hours. The mixture should be bubbly at this point and will yield the 1 cup of gluten free “sour” dough needed for this recipe. The result will not be quite as tangy, but it will still result in a slightly sour crispy cracker.
 RSS Feed