Vintage Martha Stewart Cookie Packaging
Many occasions and most holidays are brightened by cookies tailored to the theme. This holds true for Christmas to Valentine's Day to St. Patrick's Day to the Fourth of July. We bake and decorate our most attractive cookies for these special times.
As always when baking, organization and planning are key to smooth and stress-free production. In choosing cookies to be part of an assortment, aim for variety and harmony of look and flavor. Remember that soft or strongly flavored cookies need to be kept separate from the crisp or delicately flavored kind. With that in mind, I'm opting for all crisp butter cookie varieties that can be happily packaged together.
Our Cookie Box Varieties:
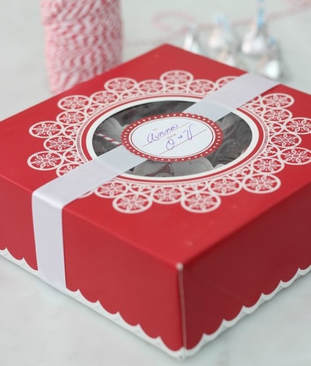
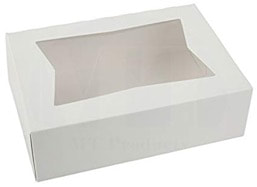
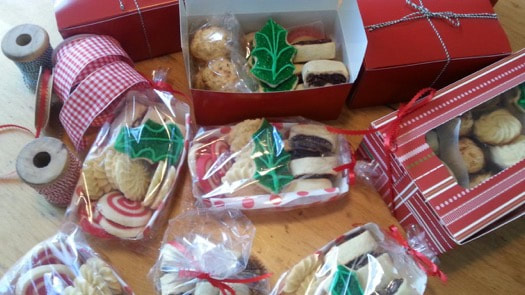
The time to decide on appropriate cookie packaging is the same time the recipes are chosen. Now one can locate just the right size box to showcase your beautiful cookie creations from the internet. I generally pick plain boxes with a see-through top so my cookies will be on display and the only extra needed is a pretty ribbon and or a personalized label.
Our Cookie Box Varieties:
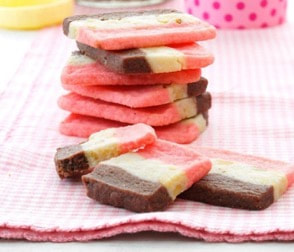
- Neapolitans
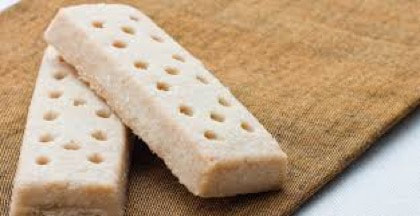
- Large Batch Shortbread
- Suzi’s Sugar Cookies
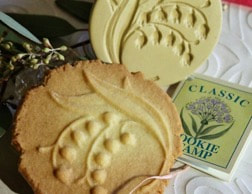
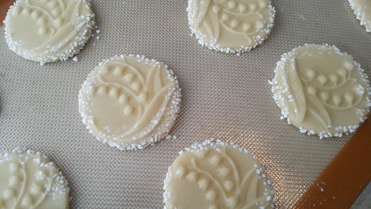
- Stamped Cookies
- Red & White Pinwheels
The time to decide on appropriate cookie packaging is the same time the recipes are chosen. Now one can locate just the right size box to showcase your beautiful cookie creations from the internet. I generally pick plain boxes with a see-through top so my cookies will be on display and the only extra needed is a pretty ribbon and or a personalized label.
 |  |
With cookie recipes and packaging chosen, pantry stock and baking equipment are the next things to review. Butter cookies have a short list of ingredients, so buying high quality butter and vanilla is key to best flavor. No artificial vanilla need apply. I stock C & H sugar and King Arthur flour. Regular table salt is fine, but check the freshness date on your baking powder can. Replace if needed. I find Costco butter to be the highest quality for the best price. Stock up on butter and freeze pound packages in zip-top bags. Butter freezes perfectly, if kept away from any strong odors: don't be tempted to bag up your smoked trout with your butter!
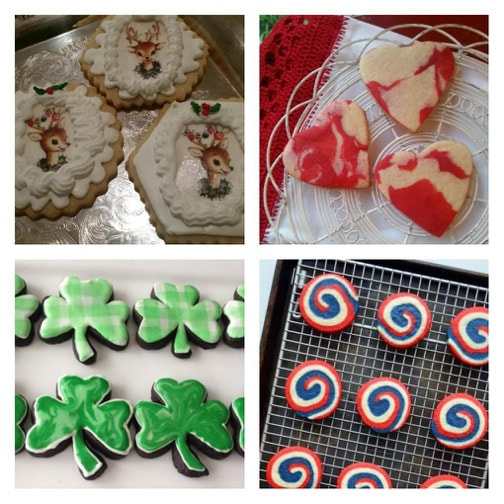
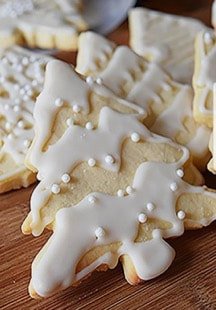
The cookies I’ve chosen this year, besides looking festive and tasting delicious, all store fairly well and are neat to pack. Notice there is only one type of cutout cookie. Some years, I’ve chosen snowflakes in various sizes or these holly cookies, shown above. Whatever I chose, I stick to the one design so my cookie collection will not look chaotic. The white on white Christmas tree cookies that we will do this year are simple yet elegant.
With cookie recipes chosen, packaging in place, and a baking date picked out, now is the time to go through your baking equipment and pantry. Here is a list of the equipment we will be using and should be in your baking arsenal. I provided a shopping list with common sizes of pantry staples such as flour and sugar. Always check your own cupboard before setting out for the store. These recipes make large batches of cookies so you will be able to make many cookie gifts for family and friends. If it seems like there will be too many cookies (is there such a thing?) you can do what I’m doing this year, which is join forces with loved ones to all bake together!
Merry Christmas & Happy Baking!
Equipment list:
- 2 or more aluminum baking sheets, lined with silicone baking mats or parchment paper
- A stand or hand mixer and mixer bowls
- Set of dry measuring cups and measuring spoons
- Silicone or rubber spatulas
- Metal spatula
- Cooling racks
- Waxed paper or additional parchment paper
- Rolling pin
- Cookie cutters
- Cookie stamps
- Loaf pan
- Sharp, thin knife
- Small shallow bowl or saucer
- Pastry brush
- Squeeze bottle or piping bag with small round tip or zip-top bag
- Scissors
Shopping/Pantry list:
- Baking powder, I suggest a new can
- Table salt, 2 ½ teaspoons
- Corn starch, ½ cup
- Flour, 10 pounds
- Sugar, 10 pounds
- Powdered Sugar, 1 pound box
- Vanilla extract, 2 ounce bottle
- Almond extract, 1 teaspoon
- Sparkling sugar, 2 tablespoons
- Red food coloring or gel color, about 1 teaspoon
- Small white decorating sugar sprinkles
- Meringue powder, 4 tablespoons
- Swedish pearl sugar, about 4 tablespoons
- Walnuts, chopped, ½ cup
- Unsweetened chocolate, 1 ounce square
- Butter, 5 pounds
- Vegetable oil, small amount
- Eggs, 1 dozen
- Cream or milk, about 2 tablespoons
Neapolitan Cookies
- 1 cup butter, softened
- 1-1/2 cups sugar
- 1 large egg
- 1 teaspoon vanilla extract
- 2-1/2 cups all-purpose flour
- 1-1/2 teaspoons baking powder
- 1/2 teaspoon salt
- 1/2 teaspoon almond extract
- 6 drops red food coloring
- 1/2 cup chopped walnuts
- 1 ounce unsweetened chocolate, melted
- Line a 9x5-in. loaf pan with waxed paper, letting ends extend up sides. In a large bowl, cream butter and sugar until light and fluffy. Beat in egg and vanilla. In another bowl, whisk flour, baking powder and salt; gradually beat into creamed mixture.
- Divide dough into three portions. Mix almond extract and food coloring into one portion; spread evenly into prepared pan. Mix walnuts into another portion; spread evenly over first layer. Mix melted chocolate into remaining portion; spread over top. Refrigerate, covered, overnight.
- Preheat oven to 350°. Lifting with waxed paper, remove dough from pan. Cut lengthwise in half; cut each half crosswise into 1/8-in. slices.
- Place 1 in. apart on ungreased baking sheets. Bake 10-12 minutes or until edges are firm. Remove from pans to wire racks to cool.
Sheet Pan Scottish Shortbread, Sunset Magazine
- 1 1/4 pounds (5 sticks) salted butter, at room temperature
- 1 1/4 cups sugar
- 4 3/4 cups all-purpose flour
- ½ cup cornstarch
- 2 tablespoons coarse white sparkling sugar
- Preheat oven to 275°. In a stand mixer, beat butter and sugar on medium speed with paddle attachment until well blended and fluffy. Gradually add all-purpose flour; beat on low until blended. Add cornstarch and beat on low speed until incorporated, scraping bowl as needed.
- Line a 12- by 17-in. rimmed baking sheet with parchment paper. Press dough into pan until very even and smooth. Bake until shortbread is golden in center, 60 to 65 minutes. Reduce oven to 250°, drape shortbread with parchment paper, and continue to bake until a finger pressed lightly into center of dough leaves no imprint, 20 to 25 minutes more
- Set shortbread on a cooling rack and sprinkle with sparkling sugar. While hot, cut into 1- by 3-in. rectangles or 2-in. squares (use a clean ruler). Let cool completely in pan. After it cools, if you find that you'd like it crunchier, pop pan into a 250° oven, covered with parchment, for about 20 minutes. Make ahead: Airtight at room temperature, up to 1 week, or frozen, up to 3 months.
Suzi’s Sugar Cookies
- 4 cups sifted all-purpose flour, plus more for dusting
- 1 teaspoon baking powder
- ½ teaspoon salt
- 1 cup (2 sticks) unsalted butter, room temperature
- 2 cups sugar
- 2 large eggs
- 2 teaspoon vanilla
- Sift flour, baking powder, and salt into a bowl
- Put butter and sugar in the bowl of an electric mixer fitted with paddle attachment. Mix on medium speed until pale and fluffy. Mix in eggs and vanilla. Reduce speed to low. Gradually mix in flour mixture. Divide dough in half; flatten each half into disk. Wrap each in plastic. Refrigerate until firm, at least 1 hour or overnight.
- Preheat oven to 325 degrees, with racks in upper and lower thirds. Let one disk stand at room temperature just until soft enough to roll, about 10 minutes. Roll out dough on lightly floured work surface to just under ¼ inch thick, adding more flour as needed to keep dough from sticking. Cut out cookies with cutter; transfer shapes to parchment paper-lined sheets as you work. Roll scraps, and repeat. Repeat with remaining disk of dough. Bake, switching positions of sheets and rotating halfway through, until edges turn golden, 10-12 minutes depending on oven. Let cool on sheets or wire racks.
Royal Icing for Cookie Decorating
- 4 tablespoons meringue powder
- 4 cups (about 1 pound box) powdered sugar
- 6 tablespoons warm water plus more to thin
- Small, white, round decorating sprinkles (nonpareils) for tree cookies
- Beat all ingredients in mixer bowl until stiff peaks form, 7-10 minutes. Beat in additional water a little at a time until desired consistency is reached. For the tree cookies pictured above, a consistency between heavy cream and corn syrup is best.
- Load icing into squeeze bottle or piping bag. Pipe icing on tree in wide swathes to look like snow. Immediately sprinkle a few white decorating sprinkles here and there. Allow to dry overnight before packaging.
Stamped Sugar Cookies (From Brown Bag Designs)
- 4 cups flour, scooped into measuring cup then leveled with table knife
- 1/2 teaspoon salt
- 1 cup (2 sticks) butter, softened
- 1 ½ cups sugar
- 2 eggs, medium or large
- 2 tablespoons cream or milk
- 2 teaspoons vanilla
- Vegetable oil
- Extra flour for dusting
- Swedish pearl sugar
Preheat oven to 350˚F after chilling dough
Special equipment: whisk, mixer bowl, hand or stand mixer, silicone spatula, plastic wrap, 2 baking sheets lined with parchment or silicone baking mats, pastry brush, shallow bowl or saucer, cooling rack
Makes 8-12 cookies depending on size of mold
Recipe may be doubled
- Whisk together flour and salt. Set aside.
- In mixer bowl, thoroughly cream butter, add sugar and mix until incorporated. Beat in egg, milk, and vanilla. Scrape bowl as needed.
- Add flour mixture and beat until smooth dough forms, about a minute. Wrap in plastic wrap and chill for 30 minutes.
- Roll pieces of dough into balls about the size of a walnut or to fit your cookie mold.Prepare cookie mold: Lightly oil cookie mold with vegetable oil using pastry brush. Wipe out any excess oil with a paper towel. Dust mold with flour and tap out excess flour. Press ball of dough into mold, release by firmly tapping edge of mold on floured surface. Repeat with remaining dough
- Place pearl sugar in a shallow bowl or saucer. Carefully roll edge of formed cookie in sugar. Place on prepared baking sheets.
- Bake for 10-12 minutes, one pan at a time, rotating baking sheet front to back halfway through baking time, just until lightly golden. Cool for 5 minutes then remove to cooling rack to cool completely.
Red & White Pinwheels
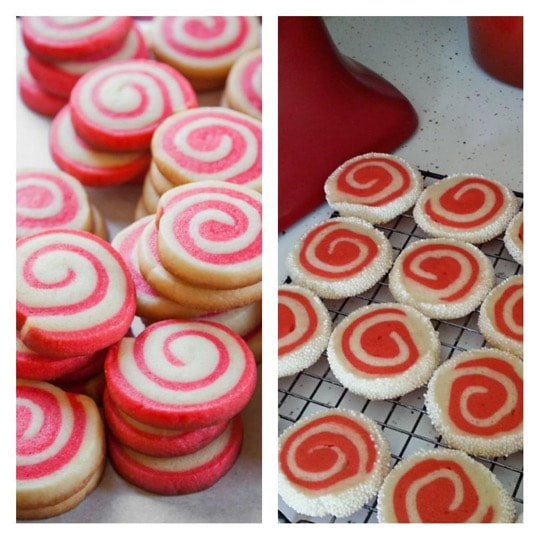
These festive spiral pinwheel cookies require a bit of effort and patience, but are a fun project. Be sure to allow plenty of time for the dough to chill, letting the dough rest in the refrigerator overnight in between steps.
Makes 3-4 dozen cookies
Makes 3-4 dozen cookies
- 1 1/4 cup (250 g) sugar
- 1 cup (225 g or 2 sticks) unsalted butter, at room temperature
- 1 teaspoon vanilla extract
- 1/2 teaspoon baking powder
- 1/2 teaspoon salt
- 1 large egg
- 3 cups (420 g) all-purpose flour
- 1/2 teaspoon liquid red food coloring or gel color
- Place the sugar, butter, vanilla, baking powder, and salt in the bowl of stand mixer fitted with a paddle attachment. Beat the ingredients together until the batter is creamy, light in color, and clings to the side of the bowl, about 2 minutes on medium speed. Scrape down the side of the bowl and add the egg. Mix until incorporated. Add the flour and mix it into the dough on low speed until no more streaks of flour remain.
- Scrape the dough out onto a clean surface and divide in half. Set one half aside. Place the other half back in the bowl, and add the red food coloring. Mix until color is incorporated and dough is uniform in color.
- Divide each half of the dough in half again – you should have 4 balls of dough, two plain and two red. Roughly shape each ball into a square or rectangle, and tightly wrap each square in plastic wrap.
- Refrigerate the dough for at least 30 minutes, or up to a day, to let the dough firm up.
- Remove one piece of dough, unwrap it, and place on a piece of wax paper or parchment paper. Place another piece of wax paper or parchment paper on top, and roll the dough into a 6 x 12 rectangle. If the dough is too hard to roll out, let it soften for a few minutes until it's easier to roll. As you roll the dough, occasionally flip it over. If the parchment paper has become wrinkled, unpeel it from the dough and reapply (so you don't get wrinkles in your dough).
- When done, transfer the rolled-out dough to a baking sheet, still sandwiched between sheets opaper. Repeat with the remaining 3 pieces of dough, stacking the sheets of dough on top of each other on the baking sheet
- Once all four pieces of dough are rolled out, place the cookie sheet with the dough in the freezer for 15 minutes. The dough should be firm, but not frozen through.
- Sandwich together the vanilla and red doughs: Remove one of the sheets of vanilla dough and one of the sheets of red dough from the freezer. Peel back the top paper on both. Carefully flip the red dough onto the vanilla dough so they are sandwiched together (vanilla on bottom, red on top – the colors are reversed in the photos, but they'll give you the general idea) Peel away the remaining paper from the red dough. Trim the edges so the two sheets of dough line up. Carefully roll the dough from the long edge to make a 12-inch long log of dough, peeling away the bottom layer of parchment as you go.
- Repeat with remaining dough: Repeat this sandwiching and rolling process, but this time put the red layer on the bottom so that when you roll the dough, the red dough is on the outside.
- Chill the logs of dough: Wrap each log of dough tightly in the parchment paper or plastic wrap. Chill in the fridge for 2 hours or overnight. (Or freeze for up to a month.)
- Heat the oven to 350ºF. Remove the chilled dough from the fridge. The bottom of the dough will be slightly flat from where it was resting in the fridge. To smooth this out, gently roll the log against the counter with your hands until the edges are smooth again. Slice the dough into slices ¼ inch- thick. Place them on the baking sheet about an inch apart.
- Bake for 10 to 12 minutes or until the cookies start to brown ever so slightly on the edges. Transfer baked cookies to a wire rack to cool. Repeat with slicing and baking the remaining dough. Store in an airtight container for up to 3 days.
 RSS Feed